Quickstart: Setting up your project and running recipes
To help orient you to OpenRewrite, let's walk through configuring a project to use the Maven or Gradle OpenRewrite plugin. Then let's walk through running various types of recipes on said project and talk through the results.
In this guide, you will:
- Clone a sample project
- Add the rewrite-maven-plugin or rewrite-gradle-plugin to your project
- Activate a recipe so it can be run
- Run a simple refactoring recipe
- Run a recipe with YAML configuration
- Add and run an externally created recipe
If you are a Moderne customer, you should use the Moderne CLI or the Moderne Platform to run recipes rather than following the instructions in this doc.
Prerequisites
This quickstart guide assumes that you:
- Are somewhat familiar with Java
- Have worked with a Maven or a Gradle project before
- Know how to run commands in the command line
- Can run basic Git commands
Step 1: Clone sample project
The first step in this process is making sure you have some code to work with. We've prepared a sample repository that you can use if you'd like. However, as all of the steps in this guide apply to any Java project built with Maven or Gradle, please feel free to use your own and skip to Step 2.
The sample spring-petclinic project requires JDK version 11+ to build (OpenRewrite does not have this requirement -- just this sample project). Get OpenJDK 11 here if you do not already have that version installed.
If you are building the project in IntelliJ and are using Gradle, make sure that you set your Gradle JVM to 11 (Build, Execution, Deployment → Build Tools → Gradle → Gradle JVM).
To clone the openrewrite/spring-petclinic-migration repository, please run this command:
git clone https://github.com/openrewrite/spring-petclinic-migration.git
Step 2: Add rewrite-maven-plugin or rewrite-gradle-plugin to your project
Once you've checked out your project, the next step is to add the OpenRewrite plugin to Maven or Gradle. Please follow the instructions in the Maven or Gradle tab to do that:
- Gradle (Groovy)
- Gradle (Kotlin)
- Maven
- Add the OpenRewrite plugin to the
pluginssection of yourbuild.gradlefile - Make sure
mavenCentral()is included in therepositoriessection - Add a
rewritesection that will be filled in later
Your file should look similar to:
plugins {
  id 'java'
  id 'maven-publish'
  id 'org.openrewrite.rewrite' version '7.37.0'
}

repositories {
  // The root project doesn't have to be a Java project, but this is necessary
  // to resolve recipe artifacts.
  mavenCentral()
}

rewrite {
  // Will configure in subsequent steps
}

// ...
- Add the OpenRewrite plugin to the
pluginssection of yourbuild.gradle.ktsfile - Make sure
mavenCentral()is included in therepositoriessection - Add a
rewritesection that will be filled in later
Your file should look similar to:
plugins {
  `java-library`
  `maven-publish`
  id("org.openrewrite.rewrite") version "7.37.0"
}

repositories {
  // The root project doesn't have to be a Java project, but this is necessary
  // to resolve recipe artifacts.
  mavenCentral()
}

rewrite {
  // Will configure in subsequent steps
}
Add a new <plugin> in the <plugins> section of your pom.xml that looks like:
<plugin>
  <groupId>org.openrewrite.maven</groupId>
  <artifactId>rewrite-maven-plugin</artifactId>
  <version>6.44.0</version>
</plugin>
At this point, you're able to run any of the Maven goals or Gradle tasks provided by the OpenRewrite plugin. See Maven Plugin Configuration or Gradle Plugin Configuration for the full set of options.
From the command line, try running mvn rewrite:discover or gradle rewriteDiscover to see a list of all the recipes available for execution. Initially, this will list only the recipes built-in to OpenRewrite.
Step 3: Activate a recipe
Before you can run any of the recipes, you will need to update the plugin configuration to mark the desired recipe(s) as "active". Let's use the org.openrewrite.java.OrderImports recipe as an example (which will ensure your imports follow a standard order). To activate this recipe, please modify your pom.xml or build.gradle(.kts) file so that the sections you modified earlier look like the below example:
- Gradle (Groovy)
- Gradle (Kotlin)
- Maven
plugins {
  id 'java'
  id 'maven-publish'
  id 'org.openrewrite.rewrite' version '7.37.0'
}

rewrite {
  activeRecipe(
      'org.openrewrite.java.OrderImports',
  )
}
plugins {
  `java-library`
  `maven-publish`
  id("org.openrewrite.rewrite") version "7.37.0"
}

rewrite {
  activeRecipe(
      "org.openrewrite.java.OrderImports",
  )
}
<plugin>
  <groupId>org.openrewrite.maven</groupId>
  <artifactId>rewrite-maven-plugin</artifactId>
  <version>6.44.0</version>
  <configuration>
    <activeRecipes>
      <recipe>org.openrewrite.java.OrderImports</recipe>
    </activeRecipes>
  </configuration>
</plugin>
Step 4: Run a simple refactoring recipe
Now that you've activated the OrderImports recipe, you can run it by executing the command:
- Gradle
- Maven
gradle rewriteRun
mvn rewrite:run
After running it, you will be notified of all of the files that have been changed:
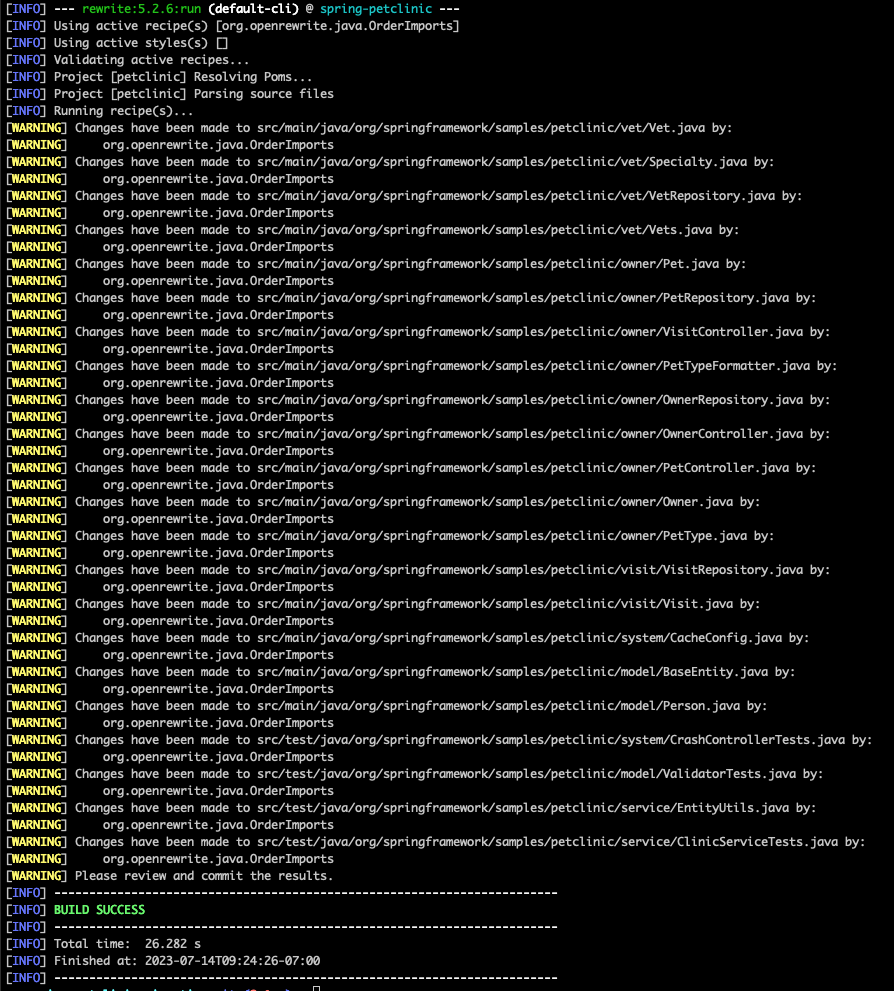
mvn rewrite:run with OrderImports set as an active recipe in the spring-petclinic-migration repositoryTo see what has changed in the code, run git diff or use your preferred IDE's diff viewer:
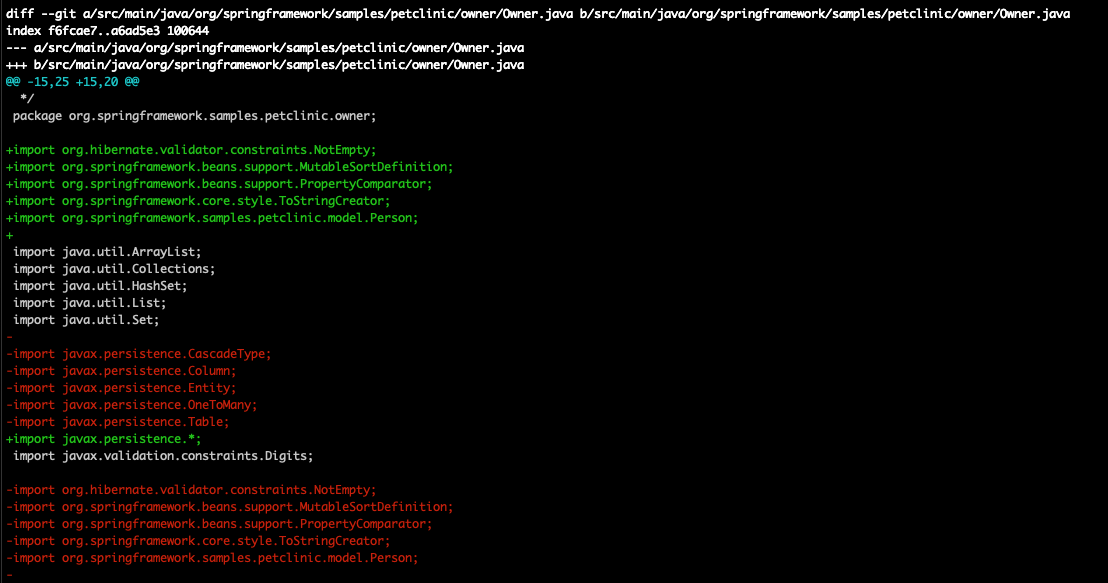
From there, you can commit the changes or add additional recipes based on your needs.
Step 5: Run a recipe with YAML configuration
Some recipes are more complex than OrderImports and require configuration (in a rewrite.yml file) to run them. For instance, the built-in recipe org.openrewrite.java.ChangePackage has three options that need to be configured:
| Type | Name | Description |
|---|---|---|
String | oldPackageName | The package name to replace. |
String | newPackageName | New package name to replace the old package name with. |
Boolean | recursive | Optional. Whether or not to recursively change subpackage names. |
To use this recipe to rename the package org.springframework.samples.petclinic.vet to org.springframework.samples.petclinic.veterinary, create a rewrite.yml file at the root of your project that looks like:
---
type: specs.openrewrite.org/v1beta/recipe
name: com.yourorg.VetToVeterinary
recipeList:
  - org.openrewrite.java.ChangePackage:
      oldPackageName: org.springframework.samples.petclinic.vet
      newPackageName: org.springframework.samples.petclinic.veterinary
YAML files are very sensitive to indentation. If you are not seeing the expected results from a YAML-configured recipe, please double-check that its arguments are indented like the above example.
If the file was created correctly, you should see com.yourorg.VetToVeterinary listed under available recipes if you run the discover command again. Also, as mentioned earlier, in order to use this recipe, you'll need to add it to your list of active recipes:
- Gradle (Groovy)
- Gradle (Kotlin)
- Maven
plugins {
  id 'java'
  id 'maven-publish'
  id 'org.openrewrite.rewrite' version '7.37.0'
}

rewrite {
  activeRecipe(
      'org.openrewrite.java.OrderImports',
      'com.yourorg.VetToVeterinary'
  )
}
plugins {
  `java-library`
  `maven-publish`
  id("org.openrewrite.rewrite") version "7.37.0"
}

rewrite {
  activeRecipe(
      "org.openrewrite.java.OrderImports",
      "com.yourorg.VetToVeterinary"
  )
}
<build>
  <plugins>
    <plugin>
      <groupId>org.openrewrite.maven</groupId>
      <artifactId>rewrite-maven-plugin</artifactId>
      <version>6.44.0</version>
      <configuration>
        <activeRecipes>
          <recipe>org.openrewrite.java.OrderImports</recipe>
          <recipe>com.yourorg.VetToVeterinary</recipe>
        </activeRecipes>
      </configuration>
    </plugin>
  </plugins>
</build>
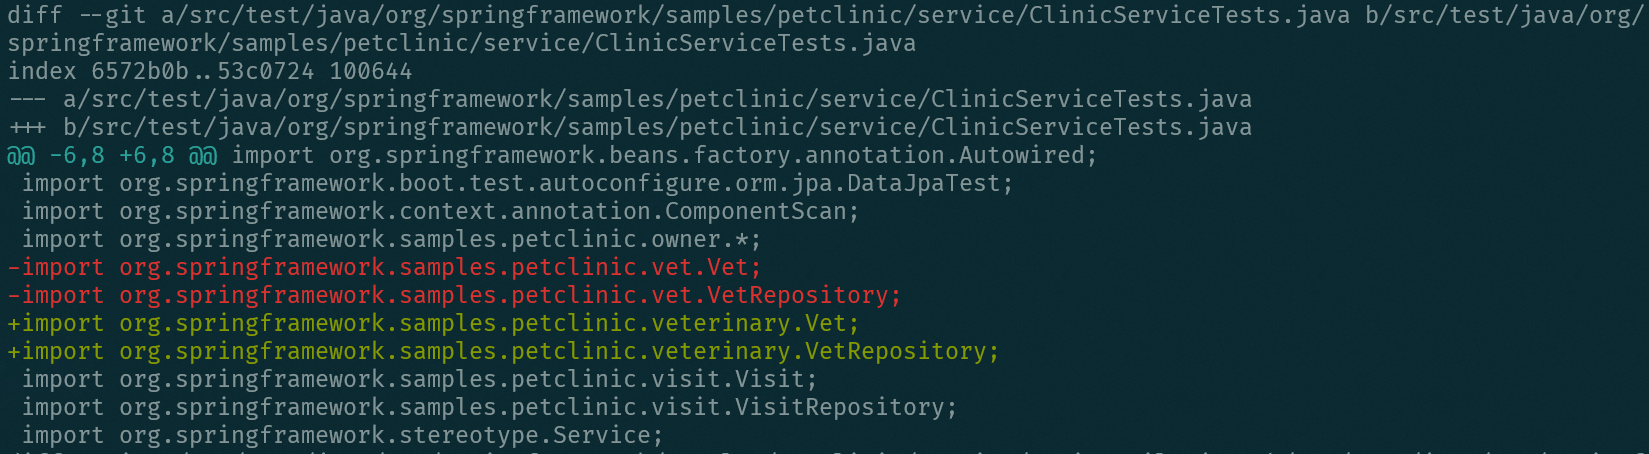
Once this recipe has been added to your active recipes, you can run either mvn rewrite:run or gradle rewriteRun to execute all of your active recipes. Afterward, you'll see that:
- The source files in the
vetpackage have been moved to the newly createdveterinarypackage - References such as import statements have been updated to reflect the new name
- All of the files have been formatted according to the previously defined
OrderImportsrules
From there, you can confirm that everything still builds and passes its tests by running mvn clean install or gradle build.
Step 6: Running Recipes from External Modules
At this point, you know how to configure and run any recipe included in OpenRewrite itself. However, many recipes are not bundled into the core library. For example, all of the Spring, Mockito, JUnit, and AssertJ-related recipes maintained by the OpenRewrite team live in the rewrite-spring repository.
You can search through all of the recipes in the OpenRewrite docs. Each recipe page has instructions for how to import the recipe and what parameters (if any) need to be included.
Let's pretend that you want to migrate JUnit 4 to JUnit 5 in a Spring project you have. If you take a look at the Usage section in the JUnit 4 to 5 migration recipe, you'll see what you need to include in your build.gradle(.kts) or pom.xml file in order to use this recipe.
Below, we'll walk through the Maven and Gradle changes and provide some additional context around said changes.
Maven + external modules
For Maven projects, you'll need to:
- Add the recipe to the
activeRecipeslist - Add a dependency on the library where the desired recipe lives (JUnit 4 to 5 lives in the rewrite-spring repository)
- Specify a version of
rewrite-springto use
After doing that, your pom.xml file should look similar to this:
<build>
  <plugins>
      <plugin>
        <groupId>org.openrewrite.maven</groupId>
        <artifactId>rewrite-maven-plugin</artifactId>
        <version>6.44.0</version>
        <configuration>
          <activeRecipes>
            <recipe>org.openrewrite.java.OrderImports</recipe>
            <recipe>com.yourorg.VetToVeterinary</recipe>
            <recipe>org.openrewrite.java.spring.boot2.SpringBoot2JUnit4to5Migration</recipe>
          </activeRecipes>
        </configuration>
        <dependencies>
          <dependency>
            <groupId>org.openrewrite.recipe</groupId>
            <artifactId>rewrite-spring</artifactId>
            <version>6.35.0</version>
          </dependency>
        </dependencies>
      </plugin>
  </plugins>
<build>
To double-check that everything is working, run the command mvn rewrite:run. Your project should be upgraded to Spring Boot 2 and all of the test classes should be updated to JUnit 5. Your pom.xml file will also have had its Spring dependencies updated, the JUnit 4 dependency removed, and the JUnit 5 dependency added.
Maven does not currently support using a bill of materials (BOM) to specify plugin versions or dependencies. This means that you will have to specify the versions of each plugin by hand, unlike in the Gradle section below.
Gradle + external modules
Unlike Maven projects, Gradle projects have two options for specifying recipe versions. You can:
- Add
rewrite-recipe-bomas a bill of materials (BOM) dependency - Add the specific dependency and version that you want (in this case
rewrite-spring)
If you choose to use the rewrite-recipe-bom, you won't have to worry about specifying versions for your OpenRewrite recipes as all of the recipes you include in your dependencies section will have an appropriate version specified in the bill of materials (BOM). For Gradle projects, this is the recommended approach.
If you choose to not use rewrite-recipe-bom, you'll need to specify the version of each OpenRewrite recipe module you use.
Presuming you chose to use the rewrite-recipe-bom, your Gradle setup should look similar to this:
- Groovy
- Kotlin
plugins {
  id 'java'
  id 'maven-publish'
  id 'org.openrewrite.rewrite' version '7.37.0'
}

rewrite {
  activeRecipe(
      'org.openrewrite.java.OrderImports',
      'com.yourorg.VetToVeterinary',
      'org.openrewrite.java.spring.boot2.SpringBoot2JUnit4to5Migration'
  )
}

dependencies {
  rewrite platform('org.openrewrite.recipe:rewrite-recipe-bom:latest.release')
  rewrite('org.openrewrite.recipe:rewrite-spring')

  // Other project dependencies
}
plugins {
  `java-library`
  `maven-publish`
  id("org.openrewrite.rewrite") version "7.37.0"
}

rewrite {
  activeRecipe(
      "org.openrewrite.java.OrderImports",
      "com.yourorg.VetToVeterinary",
      "org.openrewrite.java.spring.boot2.SpringBoot2JUnit4to5Migration"
  )
}

dependencies {
  rewrite(platform("org.openrewrite.recipe:rewrite-recipe-bom:latest.release"))
  rewrite("org.openrewrite.recipe:rewrite-spring")

  // Other project dependencies
}
To check that everything worked correctly, run the command gradle rewriteRun. You should see that the project has been upgraded to Spring Boot 2 and all of the test classes have been updated to JUnit 5.
Please note, though, that your build.gradle(.kts) file will not be updated as part of this. You will manually have to change the Spring and JUnit dependencies to reflect the appropriate versions.
Dependency management for Gradle is not yet available but this feature is on OpenRewrite's roadmap.
Next steps
Now that you know how to configure and run recipes, you may be interested in these topics:
Before making any recipes or configuring any plugins, please ensure your recipe development environment is set up. There are steps in there that are important to configure that go beyond what was included in this quick start guide.